Alfresco Content Services Helm Deployment with AWS EKS
This page describes how to deploy Alfresco Content Services (ACS) Enterprise or Community using Helm onto EKS.
Amazon’s EKS (Elastic Container Service for Kubernetes) makes it easy to deploy, manage, and scale containerized applications using Kubernetes on AWS. EKS runs the Kubernetes management infrastructure for you across multiple AWS availability zones to eliminate a single point of failure.
Architectures
Enterprise edition
The Enterprise configuration will deploy the following system (Alfresco Transform Service and Alfresco Search Enterprise are detailed in the next diagrams):
graph LR

classDef alf fill:#0b0,color:#fff
classDef aws fill:#fa0,color:#fff
classDef k8s fill:#326ce5,stroke:#326ce5,stroke-width:2px,color:#fff
classDef thrdP fill:#e098a6,color:#000

Client("👥 Clients")

subgraph Helm enterprise
  direction LR
  subgraph storage
    PersistentVolumeClaim_activemq-default-pvc(PersistentVolumeClaim: activemq-default-pvc):::k8s
    PersistentVolumeClaim_data-acs-postgresql(PersistentVolumeClaim: data-acs-postgresql):::k8s
    PersistentVolumeClaim_data-sync-postgresql(PersistentVolumeClaim: data-sync-postgresql):::k8s
    PersistentVolumeClaim_repository-default-pvc(PersistentVolumeClaim: repository-default-pvc):::k8s
  end

  subgraph workloads
    Deployment_activemq(Deployment: activemq):::thrdP
    Deployment_alfresco-cc(Deployment: alfresco-cc):::alf
    Deployment_alfresco-dw(Deployment: alfresco-dw):::alf
    Deployment_alfresco-repository(Deployment: alfresco-repository):::alf
    Deployment_alfresco-sync-service(Deployment: alfresco-sync-service):::alf
    Deployment_share(Deployment: share):::alf

    StatefulSet_elasticsearch-master(StatefulSet: elasticsearch-master):::thrdP
    StatefulSet_postgresql-sync(StatefulSet: postgresql-sync):::thrdP
    StatefulSet_postgresql-acs(StatefulSet: postgresql-acs):::thrdP
  end

  subgraph ingress
    Ingress_alfresco-cc(Ingress: alfresco-cc):::k8s
    Ingress_alfresco-dw(Ingress: alfresco-dw):::k8s
    Ingress_alfresco-repository(Ingress: alfresco-repository):::k8s
    Ingress_alfresco-sync-service(Ingress: alfresco-sync-service):::k8s
    Ingress_share(Ingress: share):::k8s
  end
end

subgraph AWS
  EFS[(EFS: Datastore)]:::aws
  EBS-acs[(EBS: Alfresco)]:::aws
  EBS-sync[(EBS: Sync)]:::aws
  EBS-mq[(EBS: ActiveMQ)]:::aws
end

Client ---> Ingress_alfresco-cc --> Deployment_alfresco-cc
Client ---> Ingress_alfresco-dw --> Deployment_alfresco-dw
Client --> Ingress_alfresco-repository --> Deployment_alfresco-repository
Client --> Ingress_share --> Deployment_share
Client --> Ingress_alfresco-sync-service --> Deployment_alfresco-sync-service

Deployment_share --> Deployment_alfresco-repository

Deployment_alfresco-repository --> StatefulSet_postgresql-acs --> PersistentVolumeClaim_data-acs-postgresql --> EBS-acs
Deployment_alfresco-repository --> Deployment_activemq
Deployment_alfresco-repository --> StatefulSet_elasticsearch-master

Deployment_alfresco-sync-service --> StatefulSet_postgresql-sync --> PersistentVolumeClaim_data-sync-postgresql --> EBS-sync
Deployment_alfresco-sync-service --> Deployment_activemq
Deployment_alfresco-sync-service --> Deployment_alfresco-repository

Deployment_alfresco-repository --> PersistentVolumeClaim_repository-default-pvc --> EFS
Deployment_activemq --> PersistentVolumeClaim_activemq-default-pvc --> EBS-mq
Alfresco Transform Services
graph LR

classDef alf fill:#0b0,color:#fff
classDef aws fill:#fa0,color:#fff
classDef k8s fill:#326ce5,stroke:#326ce5,stroke-width:2px,color:#fff
classDef thrdP fill:#e098a6,color:#000

subgraph ats[Alfresco Transform Service]
  Deployment_filestore(Deployment: filestore):::alf
  Deployment_imagemagick(Deployment: imagemagick):::alf
  Deployment_libreoffice(Deployment: libreoffice):::alf
  Deployment_pdfrenderer(Deployment: pdfrenderer):::alf
  Deployment_tika(Deployment: tika):::alf
  Deployment_transform-misc(Deployment: transform-misc):::alf
  Deployment_transform-router(Deployment: transform-router):::alf
end

subgraph AWS
  EFS[(EFS: Datastore)]:::aws
end

Deployment_activemq(Deployment: activemq):::thrdP
PersistentVolumeClaim_filestore-default-pvc(PersistentVolumeClaim: filestore-default-pvc):::k8s


Deployment_transform-router --> Deployment_activemq
Deployment_transform-router --> Deployment_imagemagick
Deployment_transform-router --> Deployment_libreoffice
Deployment_transform-router --> Deployment_pdfrenderer
Deployment_transform-router --> Deployment_tika
Deployment_transform-router --> Deployment_transform-misc
Deployment_transform-router --> Deployment_filestore

Deployment_filestore --> PersistentVolumeClaim_filestore-default-pvc --> EFS
Search Enterprise
graph TB

classDef alf fill:#0b0,color:#fff
classDef aws fill:#fa0,color:#fff
classDef k8s fill:#326ce5,stroke:#326ce5,stroke-width:2px,color:#fff
classDef thrdP fill:#e098a6,color:#000

subgraph live[Live Indexing]
  Deployment_alfresco-search-enterprise-content(Deployment: alfresco-search-enterprise-content):::alf
  Deployment_alfresco-search-enterprise-metadata(Deployment: alfresco-search-enterprise-metadata):::alf
  Deployment_alfresco-search-enterprise-path(Deployment: alfresco-search-enterprise-path):::alf
  StatefulSet_alfresco-search-enterprise-mediation(StatefulSet: alfresco-search-enterprise-mediation):::alf
end

Job_alfresco-search-enterprise-reindexing(Job: alfresco-search-enterprise-reindexing):::alf

StatefulSet_postgresql-acs(StatefulSet: postgresql-acs):::thrdP
Deployment_activemq(Deployment: activemq):::thrdP
StatefulSet_elasticsearch-master(StatefulSet: elasticsearch-master):::thrdP

Job_alfresco-search-enterprise-reindexing --> StatefulSet_elasticsearch-master
Job_alfresco-search-enterprise-reindexing --> StatefulSet_postgresql-acs

live --> Deployment_activemq
live --> StatefulSet_elasticsearch-master
Community edition
The Community configuration will deploy the following architecture:
graph LR

classDef alf fill:#0b0,color:#fff
classDef aws fill:#fa0,color:#fff
classDef k8s fill:#326ce5,stroke:#326ce5,stroke-width:2px,color:#fff
classDef thrdP fill:#e098a6,color:#000

Client("👥 Clients")

subgraph Helm community
  subgraph storage
    PersistentVolumeClaim_activemq-default-pvc(PersistentVolumeClaim: activemq-default-pvc):::k8s
    PersistentVolumeClaim_repository-default-pvc(PersistentVolumeClaim: repository-default-pvc):::k8s
    PersistentVolumeClaim_solr-default-pvc(PersistentVolumeClaim: solr-default-pvc):::k8s
    PersistentVolumeClaim_data-acs-postgresql(PersistentVolumeClaim: data-acs-postgresql):::k8s
  end
  subgraph workloads
    Deployment_activemq(Deployment: activemq):::thrdP
    Deployment_alfresco-cc(Deployment: alfresco-cc):::alf
    Deployment_alfresco-repository(Deployment: alfresco-repository):::alf
    Deployment_solr(Deployment: solr):::alf
    Deployment_share(Deployment: share):::alf
    StatefulSet_postgresql-acs(StatefulSet: postgresql-acs):::thrdP
  end
  subgraph ingress
    Ingress_alfresco-cc(Ingress: alfresco-cc):::k8s
    Ingress_alfresco-repository(Ingress: alfresco-repository):::k8s
    Ingress_share(Ingress: share):::k8s
  end
  subgraph "Alfresco Transform Service"
    Deployment_imagemagick(Deployment: imagemagick):::alf
    Deployment_libreoffice(Deployment: libreoffice):::alf
    Deployment_pdfrenderer(Deployment: pdfrenderer):::alf
    Deployment_tika(Deployment: tika):::alf
    Deployment_transform-misc(Deployment: transform-misc):::alf
  end
end

subgraph AWS
  EBS-acs[(EBS: Alfresco)]:::aws
  EBS-mq[(EBS: ActiveMQ)]:::aws
  EBS-solr[(EBS: Solr)]:::aws
  EFS[(EFS: Datastore)]:::aws
end

Client ----> Ingress_alfresco-cc --> Deployment_alfresco-cc
Client --> Ingress_alfresco-repository --> Deployment_alfresco-repository
Client --> Ingress_share --> Deployment_share

Deployment_share --> Deployment_alfresco-repository

Deployment_alfresco-repository --> Deployment_solr
Deployment_alfresco-repository --> StatefulSet_postgresql-acs --> PersistentVolumeClaim_data-acs-postgresql --> EBS-acs
Deployment_alfresco-repository --> Deployment_activemq
Deployment_alfresco-repository --> Deployment_imagemagick
Deployment_alfresco-repository --> Deployment_libreoffice
Deployment_alfresco-repository --> Deployment_pdfrenderer
Deployment_alfresco-repository --> Deployment_tika
Deployment_alfresco-repository --> Deployment_transform-misc

Deployment_alfresco-repository ---> PersistentVolumeClaim_repository-default-pvc --> EFS
Deployment_activemq --> PersistentVolumeClaim_activemq-default-pvc --> EBS-mq
Deployment_solr --> PersistentVolumeClaim_solr-default-pvc --> EBS-solr
Prerequisites
- You’ve read the projects main README prerequisites section
- You’ve read the main Helm README page
- You are proficient in AWS and Kubernetes
Make sure to have installed:
To better troubleshoot any issue, you may want to install applications such as:
Create the EKS cluster
There are multiple ways to set up an EKS cluster, but one of the most simple is by using eksctl. This section will guide you in creating a new EKS cluster that satisfy the minimum requirements to have a basic ACS installation up and running.
Set the default region you want to work on, to avoid having to add --region to every command:
export AWS_DEFAULT_REGION=eu-west-1
Set the cluster name in an environment variable that can be reused later:
EKS_CLUSTER_NAME=my-alfresco-eks
Create the cluster using the latest supported version - check the main README. Most common choices for instance types are m5.xlarge and t3.xlarge:
eksctl create cluster --name $EKS_CLUSTER_NAME --version 1.33 --instance-types t3.xlarge --nodes 3
Enable the OIDC provider that is necessary to install further EKS addons later:
eksctl utils associate-iam-oidc-provider --cluster=$EKS_CLUSTER_NAME --approve
For further information please refer to the Getting started with Amazon EKS – eksctl guide.
Set up ACS infrastructure dependencies
Now that we have an EKS cluster up and running, there are a few one time steps that we need to perform before ACS can be successfully installed.
Storage
There are multiple storage options available when deploying on AWS.
For the main content-store, you can alternatively:
- Use an Elastic File System, installing the (EFS CSI driver) (the default, as documented below, required when repository replicas are more than 1)
- Use an EBS block-storage, enabling EBS CSI driver (when repository replicas are just one and with node groups in the same availability zone - not meant for production)
- Use an S3 bucket
For the database, you can alternatively:
- Use the embedded postgres instance provided by the helm chart by default, enabling EBS CSI driver
- Use RDS
For the messaging broker, you can alternatively:
- Use the embedded activemq provided by the helm chart by default, enabling EBS CSI driver
- Use Amazon MQ
Please checkout the Alfresco Products Official Documentation for more details on how to configure content stores, databases and ActiveMQ.
EFS CSI Driver
-
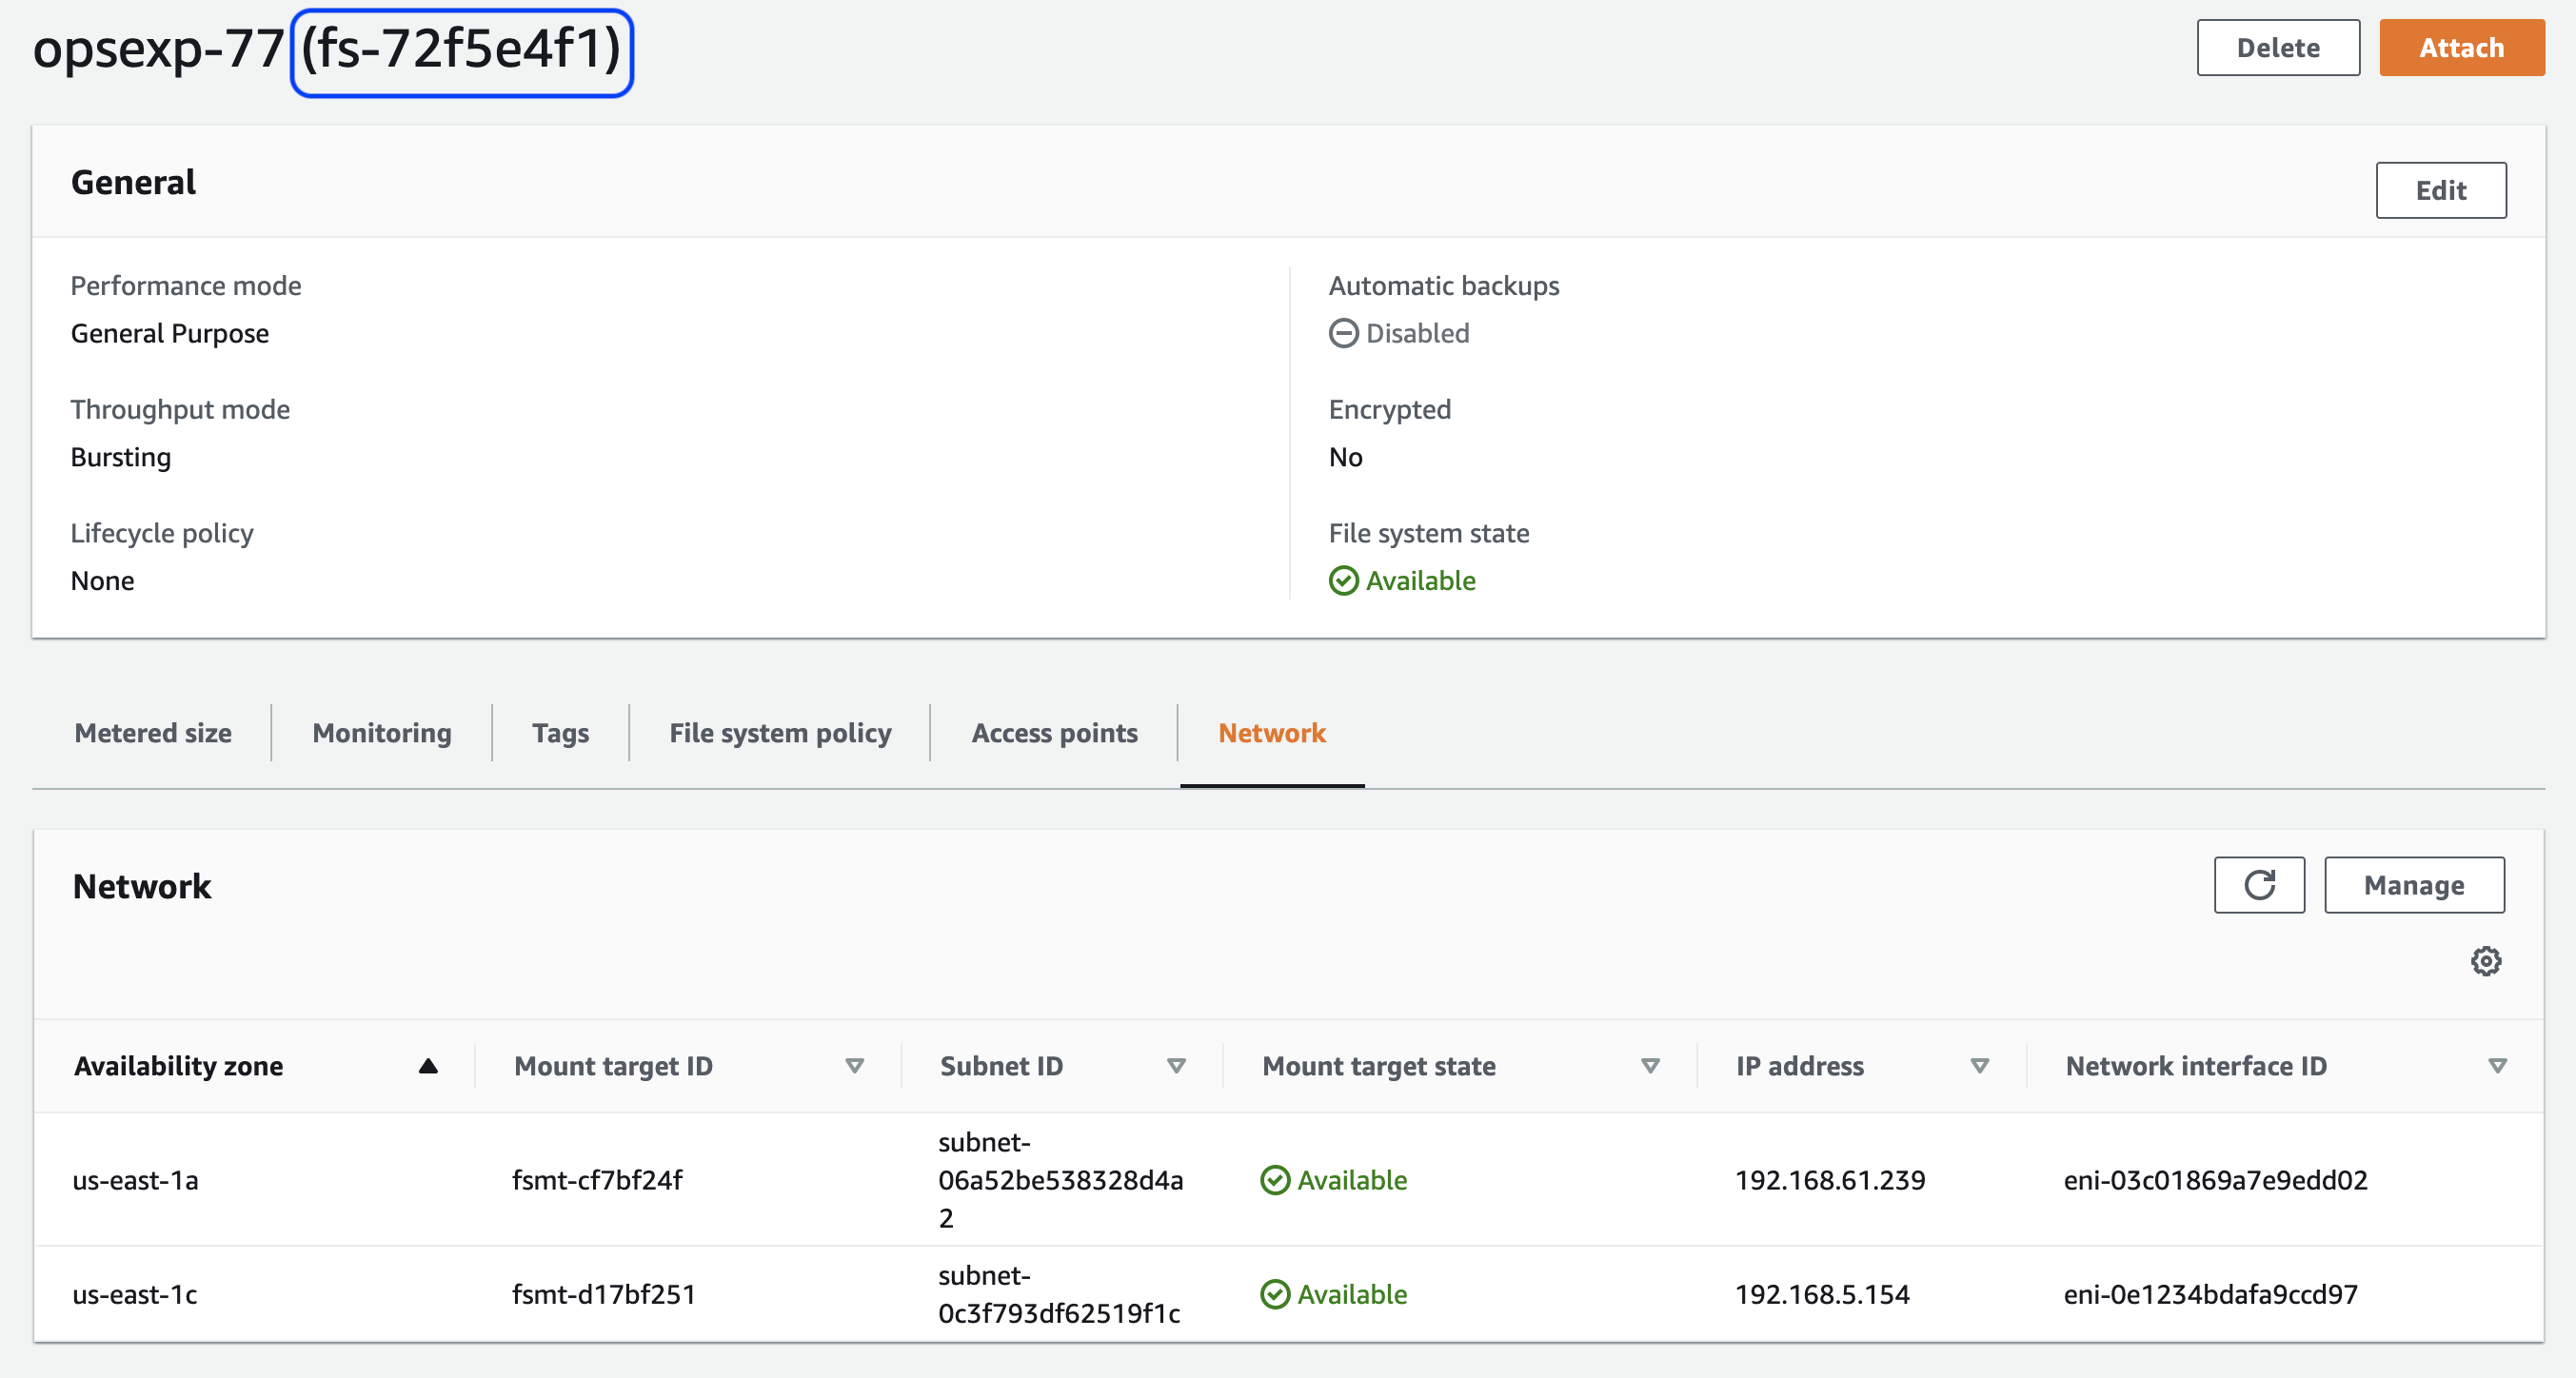
Create an Elastic File System in the VPC created by EKS using these steps ensuring a mount target is created in each subnet. Make a note of the File System ID (circled in the screenshot below).
-
Find The ID of VPC created when your cluster was built using the command below (replacing
YOUR-CLUSTER-NAMEwith the name you gave your cluster):aws eks describe-cluster \ --name $EKS_CLUSTER_NAME \ --query "cluster.resourcesVpcConfig.vpcId" \ --output text -
Find The CIDR range of VPC using the command below (replacing
VPC-IDwith the ID retrieved in the previous step):aws ec2 describe-vpcs \ --vpc-ids VPC-ID \ --query "Vpcs[].CidrBlock" \ --output text -
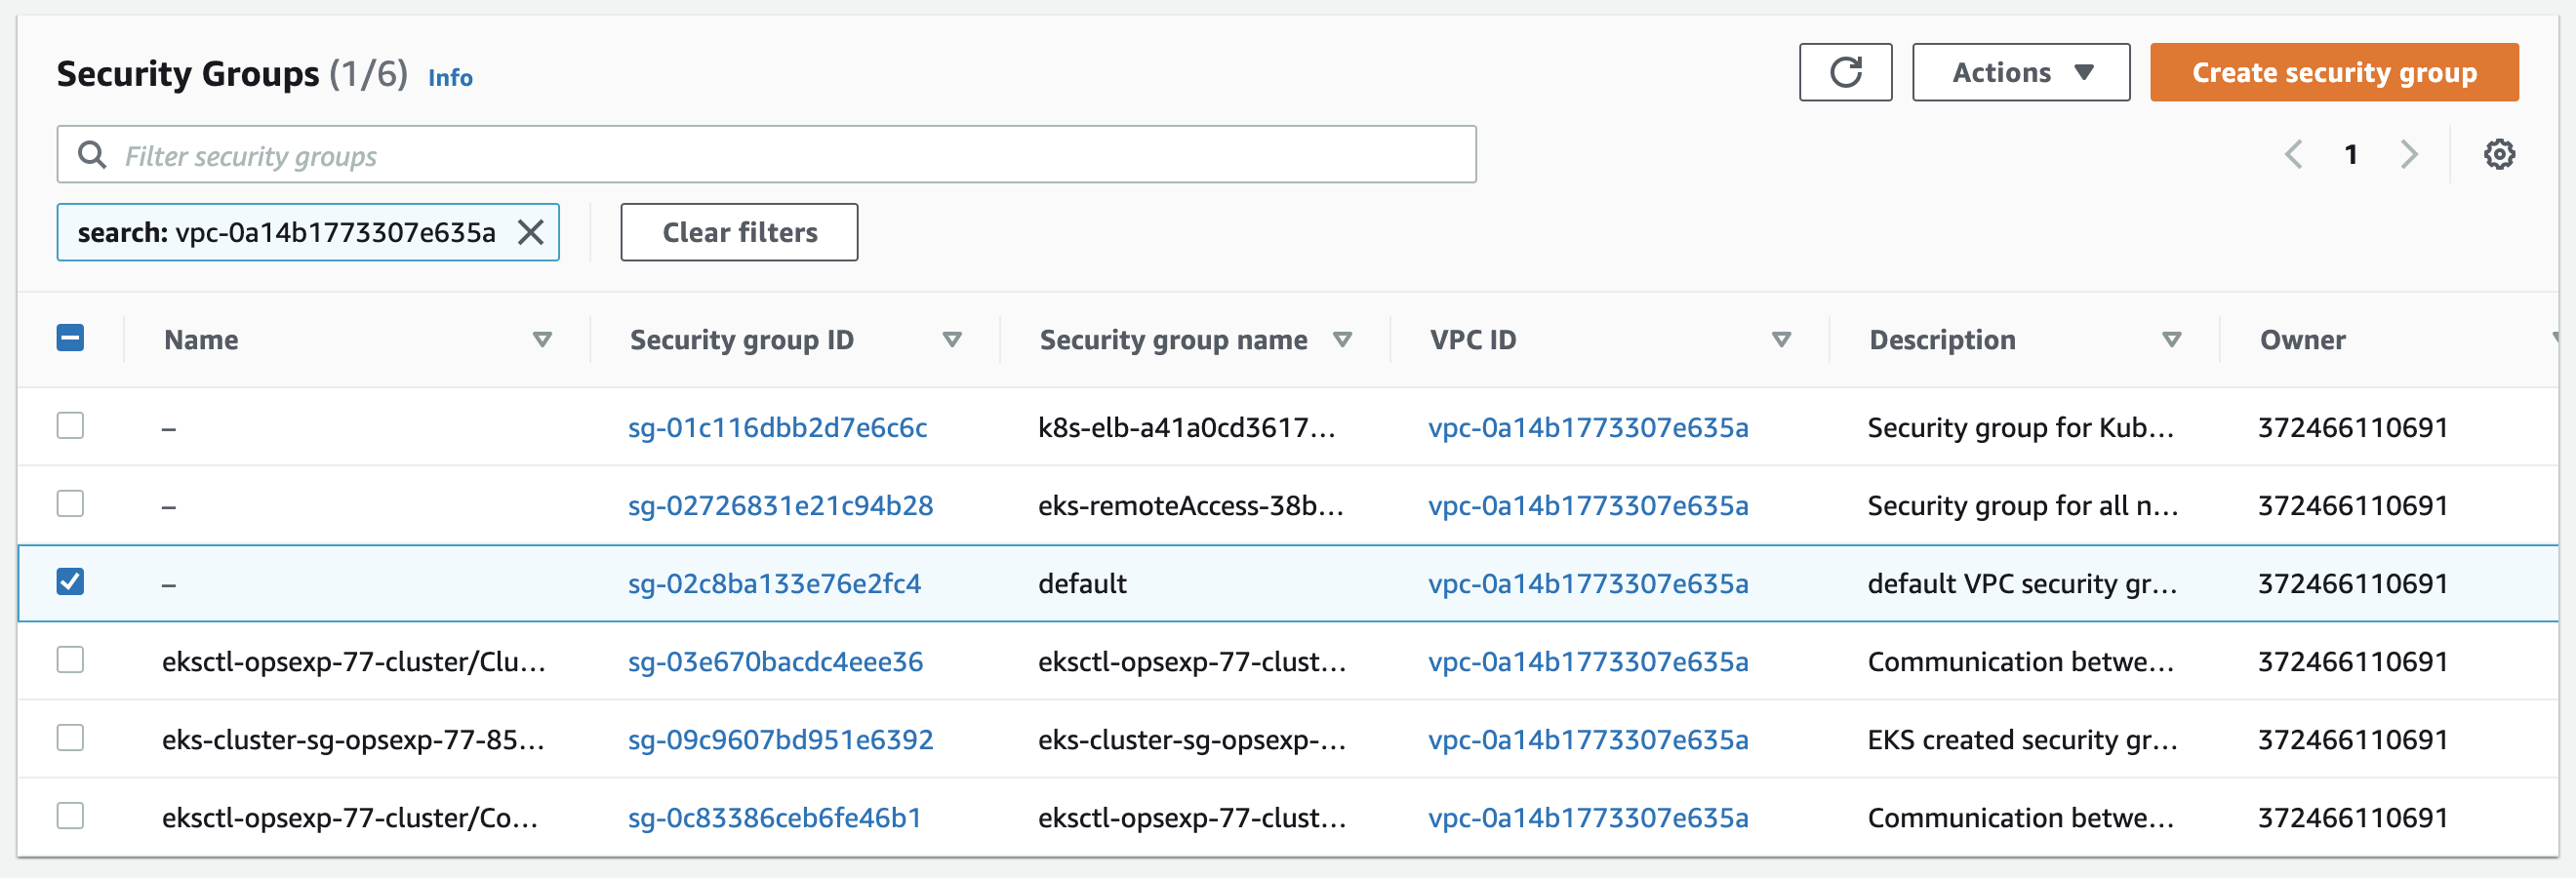
Go to the Security Groups section of the VPC Console and search for the VPC using the ID retrieved in step 2, as shown in the screenshot below:
-
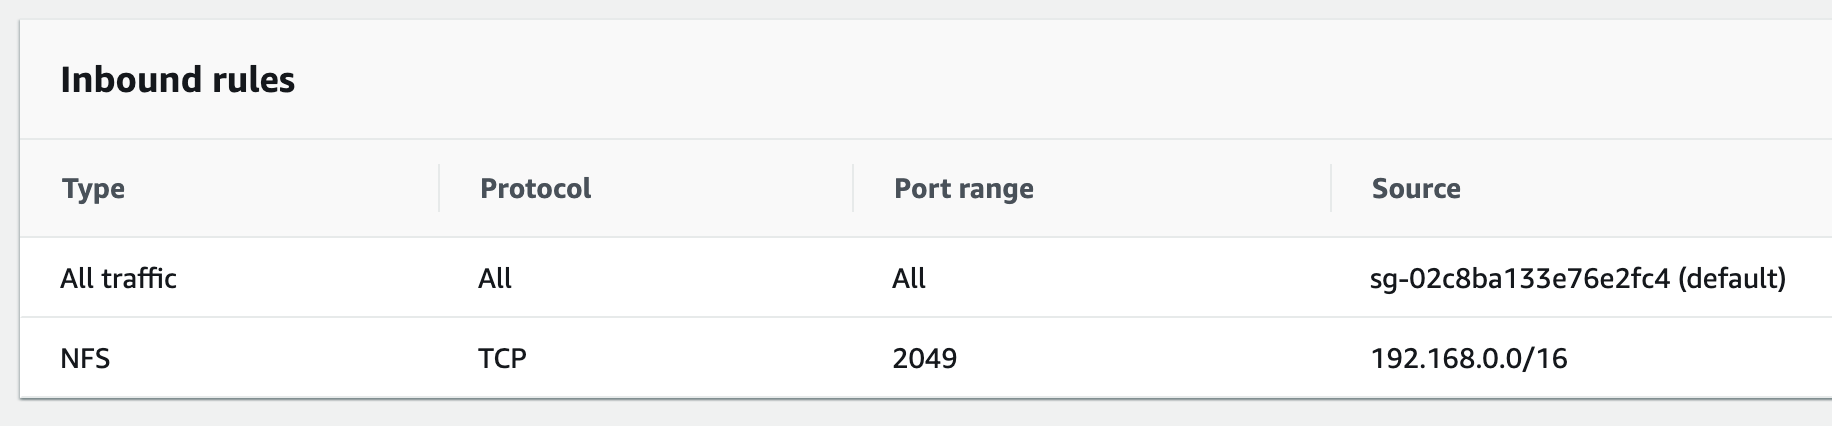
Click on the default security group for the VPC (highlighted in the screenshot above) and add an inbound rule for NFS traffic from the VPC CIDR range as shown in the screenshot below:
-
Deploy the AWS EFS csi storage driver using the following commands, replacing
fs-SOMEUUIDwith the string “file-system-id” where file-system-id is the ID retrieved in step 1 and aws-region is the region you’re using e.g. “fs-72f5e4f1” (this step replace previous deployment of the now obsolete nfs-client-provisioner):cat > aws-efs-values.yml <<EOT storageClasses: - mountOptions: - tls name: nfs-client parameters: directoryPerms: "700" uid: 33000 gid: 1000 fileSystemId: fs-SOMEUUID provisioningMode: efs-ap reclaimPolicy: Retain volumeBindingMode: Immediate EOT helm repo add aws-efs-csi-driver https://kubernetes-sigs.github.io/aws-efs-csi-driver helm upgrade aws-efs-csi-driver aws-efs-csi-driver/aws-efs-csi-driver \ --install \ --namespace kube-system \ -f aws-efs-values.yml
Note: the
storageClassis set toRetainfor obvious safety reasons. That however means kubernetes administrator need to take care of volume cleanup.
EBS CSI Driver
Since EKS 1.24 it is mandatory to install EBS CSI Driver for the dynamic provisioning via the default
gp2storage class. Upgrading from 1.23 without it will break any existing PVC. Since 1.30 EKS no longer includes thedefaultannotation on thegp2StorageClass resource applied to newly created clusters. After installing aws-ebs-csi-driver addon you have to create default StorageClass.
Set the aws account id in an environment variable that can be reused later:
AWS_ACCOUNT_ID=$(aws sts get-caller-identity --query Account --output text)
Create the IAM Service Account with access to EBS that will be used by the driver:
eksctl create iamserviceaccount \
--name ebs-csi-controller-sa \
--namespace kube-system \
--cluster $EKS_CLUSTER_NAME \
--attach-policy-arn arn:aws:iam::aws:policy/service-role/AmazonEBSCSIDriverPolicy \
--approve \
--role-only \
--role-name AmazonEKS_EBS_CSI_DriverRole
Enable the addon referencing the IAM role created previously:
eksctl create addon \
--name aws-ebs-csi-driver \
--cluster $EKS_CLUSTER_NAME \
--service-account-role-arn arn:aws:iam::${AWS_ACCOUNT_ID}:role/AmazonEKS_EBS_CSI_DriverRole \
--force
Create default storage class:
kubectl apply -f - <<EOF
apiVersion: storage.k8s.io/v1
kind: StorageClass
metadata:
  name: ebs-csi-default-sc
  annotations:
    storageclass.kubernetes.io/is-default-class: "true"
provisioner: ebs.csi.aws.com
volumeBindingMode: WaitForFirstConsumer
allowVolumeExpansion: true
EOF
At this point the provisioning of EBS volumes using the default GP3 storageClass will be handled by this driver.
For further information please refer to the official Amazon EBS CSI driver guide.
Deploy
Now the EKS cluster is set up, we can start to provision Kubernetes resources on top of it.
Ingress
See Traefik section.
The ingress-nginx section is kept for reference only, as ingress-nginx is deprecated and not recommended for new deployments.
DNS
In order to access Alfresco once installed, you need to set up a DNS record that resolves to the ELB hostname that has been provisioned by the Service of type LoadBalancer of the Ingress Controller.
To retrieve the automatically assigned hostname of the ELB you need to inspect the Ingress Controller Service of type LoadBalancer:
kubectl get service -n traefik
which will return an output like the following:
NAME                       TYPE           CLUSTER-IP       EXTERNAL-IP                       PORT(S)                      AGE
traefik                    LoadBalancer   10.100.132.184   ???.eu-west-1.elb.amazonaws.com   80:31780/TCP,443:32152/TCP   3m
Now you can proceed to creating a new DNS record in YOUR-DOMAIN-NAME zone, like:
- Record name:
acs - Record type:
CNAME - Value:
???.eu-west-1.elb.amazonaws.com
Wait a few minutes before trying to access http://acs.YOUR-DOMAIN-NAME in your browser to allow the new record to propagate. Once ready, you should get a default 404 Not Found error page.
Set an environment variable with the hostname which will be useful later.
export ACS_HOSTNAME=acs.YOUR-DOMAIN-NAME
HTTPS
The simplest way to access applications running on Kubernetes behind HTTPS is using cert-manager to request on-the-fly a LetsEncrypt certificate. This is an optional but recommended step.
In case you have a private PKI, you may want to take a look at providing a custom certificate without cert-manager instead.
Add the cert-manager helm repository:
helm repo add jetstack https://charts.jetstack.io --force-update
helm repo update
Install it:
helm install \
cert-manager jetstack/cert-manager \
--namespace cert-manager \
--create-namespace \
--set installCRDs=true
Create a ClusterIssuer resource which will automatically register a new account on LetsEncrypt production directory, generate a private key and be ready to request certificates for any ingress that will contain a reference to it:
kubectl apply -n cert-manager -f - <<EOF
apiVersion: cert-manager.io/v1
kind: ClusterIssuer
metadata:
  name: letsencrypt-prod
spec:
  acme:
    server: https://acme-v02.api.letsencrypt.org/directory
    privateKeySecretRef:
      name: letsencrypt-key
    solvers:
    - http01:
        ingress:
          ingressClassName: traefik
EOF
Download the values file and automatically replace the ${ACS_HOSTNAME} variable. When running the helm install command later, you will provide it with --values letsencrypt_values.yaml argument:
curl https://raw.githubusercontent.com/Alfresco/acs-deployment/master/docs/helm/values/letsencrypt_values.yaml | envsubst > letsencrypt_values.yaml
Set up namespace
Namespaces in Kubernetes logically groups resources, so it’s good practice to create a namespace dedicated to alfresco using the following command (we’ll then use the alfresco namespace throughout the rest of the tutorial):
kubectl create namespace alfresco
Get charts
This repository allows you to either deploy a system using released stable artefacts or the latest in-progress development artefacts.
To use a released version of the Helm chart add the stable repository using the following command:
helm repo add alfresco https://kubernetes-charts.alfresco.com/stable
helm repo update
Development version of charts
Alternatively, to use the latest in-progress development version of the Helm charts, you can clone the git repository or grab the master zip directly from GitHub.
Enter the helm/alfresco-content-services folder and fetch dependencies with:
cd acs-deployment/helm/alfresco-content-services
helm dep build
Now you can run the next helm commands using . instead of alfresco/alfresco-content-services.
Install charts
Choose your desired ACS version (Enterprise or Community) - latest or previous - and proceed to the corresponding section below for installation instructions.
Please note that we are using helm upgrade --install instead of the usual helm install so you can simply re-run the command as many times as you want and upgrade an eventually existing deployment after tuning values.
Latest Enterprise Version
See the registry authentication page to configure credentials to access the Alfresco Enterprise registry.
Deploy the latest version of ACS by running the following command (replacing YOUR-DOMAIN-NAME with the hosted zone you created earlier):
helm upgrade --install acs alfresco/alfresco-content-services \
--set alfresco-repository.persistence.enabled=true \
--set alfresco-repository.persistence.storageClass="nfs-client" \
--set alfresco-transform-service.filestore.persistence.enabled=true \
--set alfresco-transform-service.filestore.persistence.storageClass="nfs-client" \
--set global.known_urls=https://${ACS_HOSTNAME} \
--set global.alfrescoRegistryPullSecrets=quay-registry-secret \
--values letsencrypt_values.yaml \
--namespace=alfresco
Latest Community Version
Download the Community values file with:
curl -fO https://raw.githubusercontent.com/Alfresco/acs-deployment/master/helm/alfresco-content-services/community_values.yaml
Deploy ACS Community by running the following command:
helm upgrade --install acs alfresco/alfresco-content-services \
--values=community_values.yaml \
--set alfresco-repository.persistence.enabled=true \
--set alfresco-repository.persistence.storageClass="nfs-client" \
--set global.known_urls=https://${ACS_HOSTNAME} \
--set global.search.sharedSecret=$(openssl rand -hex 24) \
--values letsencrypt_values.yaml \
--namespace=alfresco
Previous Enterprise Versions
Use the above helm commands and pass an additional argument as described in this section.
Wait for successful deployment
You can monitor the progress of deployments with:
kubectl get pod -n alfresco
In a few minutes, each pod should be in Running in the Status column and showing 1/1 in the Ready column.
If it doesn’t happen, you can first describe the pod not in the Running state yet and look for the events section at the end:
kubectl describe pod acs-alfresco-repository-???-??? -n alfresco
If the pod is in the running state but can’t achieve the 1/1 Ready before the readiness probe fails as many times the readiness threshold allows, you should take a look at the logs with:
kubectl logs acs-alfresco-repository-???-??? -n alfresco
Access
When the deployment has completed the following URLs will be available (replacing YOUR-DOMAIN-NAME with the hosted zone you created earlier):
- Repository:
https://acs.YOUR-DOMAIN-NAME/alfresco - Share:
https://acs.YOUR-DOMAIN-NAME/share - API Explorer:
https://acs.YOUR-DOMAIN-NAME/api-explorer
If you deployed Enterprise you’ll also have access to:
- ADW:
https://acs.YOUR-DOMAIN-NAME/workspace/ - Sync Service:
https://acs.YOUR-DOMAIN-NAME/syncservice/healthcheck
If you requested an extended trial license navigate to the Admin Console and apply your license:
https://acs.YOUR-DOMAIN-NAME/alfresco/service/enterprise/admin/admin-license- Default username and password is
admin - See Uploading a new license for more details
Configure
By default, this tutorial installs an out-of-the-box setup, however there are many configurations options described here. There are also several examples covering various use cases.
This deployment is also not fully secured by default, to learn about and apply further restrictions including pod security, network policies etc. please refer to the EKS Best Practices for Security.
Uninstall
Remove the acs deployments by running the following command:
helm uninstall acs -n alfresco
Delete the Kubernetes namespace using the command below:
kubectl delete namespace alfresco
If you created an EFS filesystem before, go to the EFS Console, select the file system and press the “Delete” button to remove the mount targets and file system.
Finally, delete the EKS cluster:
eksctl delete cluster --name $EKS_CLUSTER_NAME